It seems that the guy that gave me the busted laptop may not have had full rights to do so. It was written off because of the damage but he is leaving a project and it's the project that owns the laptop, not him, and they want to know what happened to it.
In the back of my head I wondered if this would ever happen, and with that in mind I kept all the relevant bits and pieces. If need be, it can be re-constructed into it's original damaged state (sounds weird I know) but at the moment it sounds like a box of parts will suffice as the actual damaged bit (the screen) hasn't been touched other than being removed from the rest of the unit.
Here's hoping they take a look at it, and agree to let me keep it after assessing the damage. If not, then I'll just have to wait until my 11" MacBook Air kicks the bucket in some fashion and make another one out of that.
Monday, December 20, 2010
Wednesday, November 17, 2010
New Toy
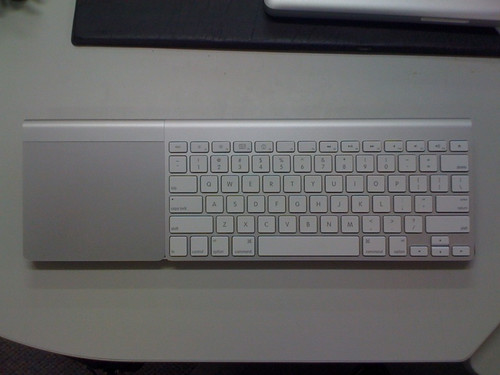
Got myself a new 11" MacBook Air (base model)
No, I won't be pulling this one apart (not just yet...give me a couple of years until it's next to worthless residual value), but I will be testing the performance between this and the air/keyboard project.
As amazed as I was with the original, this one is even better. About as close to a netbook Apple is going to give us I think. :)
Thursday, October 21, 2010
New MAcBook Air's
So, we got some new MacBook Air's finally :)
What does this mean for hacking I wonder? Hopefully it means some cheap second hand RevB Air's come on the market but the more interesting thing is the new 11" form factor, integrated SSD's and external ports that aren't on a flip out door would make for an awesome Mac keyboard mod.
Anyway, unless someone wants to buy me one, it won't be happening soon.
New designs for the Mac keyboard case will be up shortly.
Monday, October 18, 2010
No posts for a month! WHAT!
Thanks to reader Nathan for the post title ;)
hmm..yes...no posts...the replacement parts I bought off ebay still sit in the box and I haven't progressed any further. The dremel is still sitting on the bench, plugged in and hasn't moved in a month. Scraps of plastic still lie where they fell. The corpse of a once beautiful laptop rests under a pile of papers, bluetooth keyboards and the hat I wore three weeks ago...
There are a couple of reasons for this. The main one is that the place I have a day job re-structured and I had to re-apply for my job. This took up a bunch of time and some emotional effort to get past and there wasn't the 'free' time to go play in the garage by myself (although doing as much would have been good therapy). The other reason is that I have been away on and off doing other things and I was hoping to have had this thing finished already but I hit a few stumbling blocks and I lost the momentum.
Never mind...I have used the time to have a good long think about the case design and after seeing this nice unit I'm going to try for something that isn't as cramped (but not made of wood). What I will probably end up doing is having the battery located under the keyboard/trackpad and shifting the internals rearward a couple of centimetres. This means the pitch of the keyboard won't be as pronounced as it is at the moment and some other components won't be forced into positions of potential failure which is another issue I had (the ribbon cables and connectors are't exactly built for multiple bends/insertions and I broke a couple...hence buying spare parts)
Anyway... hopefully I'll have something a bit more substantial to show in a short while.
Wednesday, September 1, 2010
Still here
Still here.
Haven't managed to work on anything for the past week. Been away and will be busy this weekend shooting a wedding (doing that other thing I do).
Trying to re-think the whole battery thing. Might need to do some minor modification of the casing to make it fit right but the danger there is accidentally puncturing one of the lithium cells and we don't want that.
Thursday, August 26, 2010
Replacement parts and Amiga's
Well my replacement to case turned up today...that gives me spares of quite a few bits which will be good.
I've also picked up a narrow heatsink for the CPU/GPU to help dissipate the heat somewhat. Should be able to finish this little project up next week.
All this (plus some comments from readers) has re-lit the spark inside me that I reserve for the Commodore Amiga. I fired up WinUAE for the first time in a long while....I still suck at Shadow of the Beast. Part of me will always wonder what would have happened if Commodore didn't go bankrupt....would we be using Amiga desktop machines or would they have been just another also-ran like Be or Acorn? Who knows. All I can say is that the Amiga is one thing from my childhood that I can look back on and they still look cool :)
So I made a little image that merges the two together :)
Monday, August 23, 2010
Sunday, August 22, 2010
Setbacks and boot videos.
As I might have mentioned earlier, I had a litle setback where the power LED unit wasn't working. Since then the power button decided to be sporadic and because theres sone little resistor thing somewhere in the mix, kernel_task keeps hogging all the CPU.
I have narrowed down the source of the problem though. There is a narrow distribution board that forms the junction between the keyboard, trackpad, power LED/IR receiver and also has some IC's on it that probably interpret the goings on and whatnot. Anyway, all this connects to the motherboard via a single ribbon cable. Now, everything works but only if I hold the cable in a certain way. When I let go everything stops working. This leads me to believe that there is damage either in the cable or the connector it connects to. Either way, not good.
To that end I'm ordering a replacement top case which includes all those components plus a bit more for about $70 delivered (used condition - new they are over $200). This will give me some spares for other components which is a good thing anyway :). Anyway, this means that things will be on hiatus until the replacement parts arrive.
I do have a boot video but it's with the top off and with me holding the data cable the right way to get the power butting working (holding things correctly and Apple products...hmmm). Anyway, I'll post it up if there's interest but really its only purpose would be to show that it starts up....and it's always been able to do that since day one. The point of all this was to cram a working computer int a keyboard.
One final note, I've re-attached the left hand side, mounted the power button and cut a rebate for the battery to sit in. Once the spare parts arrive the MacBook Air Project will be pretty much complete :)
I saw that Engaget article about the guy that wired up the trackpad to the 5V USB power. Might be able to incorporate some of this...but only if it can be done cleanly. I'd like to keep the keyboard and trackpad unmodified if possible.
Friday, August 20, 2010
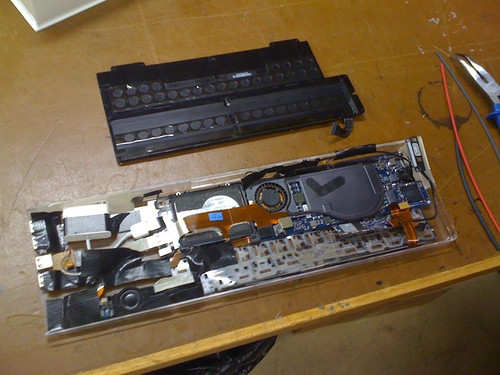
Hooking up the battery
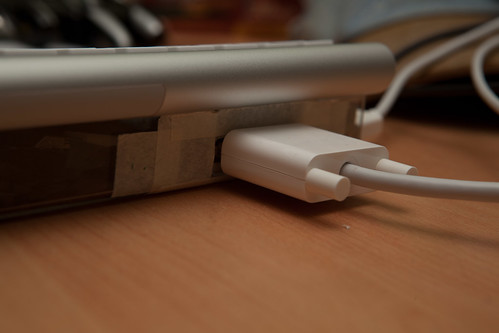
So I took to the battery cables today to try and lengthen them a bit. For this I would recommend you have all the right tools. This means wire strippers, soldering iron and heatshrink so you don't create a short.
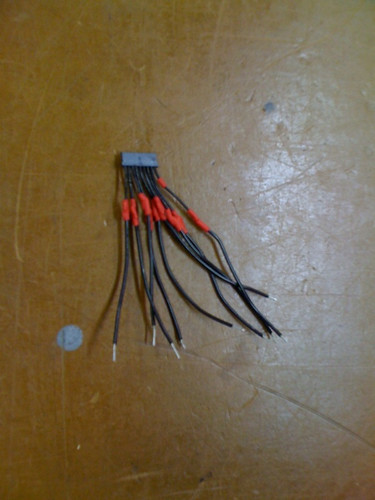
All the bits
Hmm...decisions decisions.
For this little hack I went for standard aluminium wire...same stuff that I found inside the batteries wire
Here's the connector with the new wire extensions attached and heatshrinked. That little section of heatshrink you can see on the rightmost wire is there to identify it as "pin 1". Without it there is no way to know which way the connector connects and who knows what would happen there.
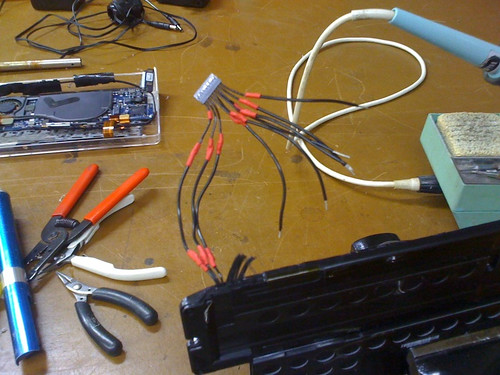
Here's the wires being attached to the battery one by one. The battery is being held (loosely but not too loosely) in a clamp while everything is hooked up
Perfect - the battery sits in place nicely and the connector reaches without too much slack. Here you can see power connected up and charging the battery. It also still boots off battery so that means I got it all hooked back together properly :)

Here's a closeup of the wire extension connected to the motherboard. The black tape is there just to keep the wires bunched and protect the motherboard somewhat.
Sorry for all the "crappy" photos that I've taken along the way. The only camera I take with me all the time is my iPhone 3G. I do have a dSLR but it's a bit bulky to be carting around the place all the time. I 'would' have an iPhone 4 (been hanging out to get one) but so far there is a 4-5 week wait and most places have stopped taking names anyway.
Ah well....all in good time I guess :)
All the bits
Hmm...decisions decisions.
For this little hack I went for standard aluminium wire...same stuff that I found inside the batteries wire
Here's the connector with the new wire extensions attached and heatshrinked. That little section of heatshrink you can see on the rightmost wire is there to identify it as "pin 1". Without it there is no way to know which way the connector connects and who knows what would happen there.
Here's the wires being attached to the battery one by one. The battery is being held (loosely but not too loosely) in a clamp while everything is hooked up
Perfect - the battery sits in place nicely and the connector reaches without too much slack. Here you can see power connected up and charging the battery. It also still boots off battery so that means I got it all hooked back together properly :)
Here's a closeup of the wire extension connected to the motherboard. The black tape is there just to keep the wires bunched and protect the motherboard somewhat.
Sorry for all the "crappy" photos that I've taken along the way. The only camera I take with me all the time is my iPhone 3G. I do have a dSLR but it's a bit bulky to be carting around the place all the time. I 'would' have an iPhone 4 (been hanging out to get one) but so far there is a 4-5 week wait and most places have stopped taking names anyway.
Ah well....all in good time I guess :)
Wednesday, August 18, 2010
Back in business
Some CPR and a shock with the defibrillator and we're back in business. Not without some scars though (power LED refuses to work although it flickers every now and then). I'm confident that all I have is a loose connection or two and that should be easily fixable.
What's of interest now though is that I still have the LED strip from the keyboard backlight. Once everything is secure I'm wondering if it could be incorporated into some form of case lighting....hmmmmm.
To whet your appetite for pictures, here's a crappy iPhone shot of the unit in use (writing this post actually), running off battery (so keyboard and trackpad are not on top. Once I extend the battery cables that big black thing will shift down and fits almost perfectly above the motherboard. As an added bonus, it also shields the trackpad from RF interference from the wifi/bluetooth module.
Uh Oh :-/
Hmm...slight setback.
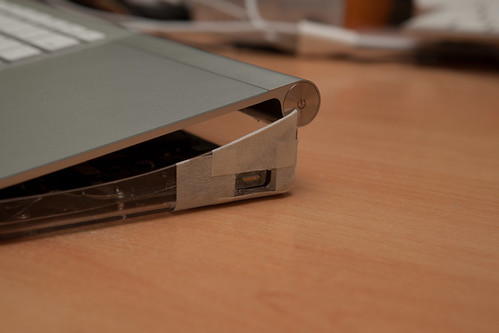
The last day I've been concentrating on work. In my free time I've been looking at extending the power lead for the battery as well as get the hole drilled for the power button.
The first setback is that the MagSafe connector pulled itself free while I was playing with the battery location and in the process damaged the plastic plug on the motherboard. The pins look undamaged but I'm yet to plug in mains power to see if any smoke comes out. All going well i'll permanently seal this up with a dab of hot glue.
The second setback is a bit more annoying. The little module with the IR sensor, power light and the little black other thing on it has stopped working. If you've been keeping track you know this means the machine thinks it's overheating or something and throttles the CPU (I.e. kernel_task shoots to 150%)
Any apple techs that may come across this and want to share their insight I'd be most grateful (I know you're watching....google analytics tells all ;)
In the meantime I'll make sure the contacts are clean and no traces are cracked and hope for the best.
Tuesday, August 17, 2010
Thermal battery test
So I think I'm going to be able to include the battery in this project after all.
Here's the battery sitting under the keyboard (trackpad removed for illustration).

You can see the location of the power LED here too. The IR port is just to the left of that.
Anyway, the battery should fit with a little modification. I'll have to cut a rebate in the back and there's a couple of tabs on the right hand side that feel like they have nothing in them so they can be chopped off as well (I think...don't want to be cutting into lithium with a dremel). I'll also have to extend the power cables as they won't reach the way they are (it's not plugged in in the pic above).
The main issue will be temperature.
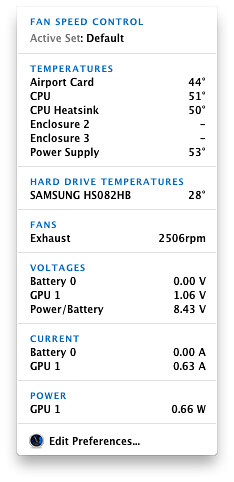
Without the battery in there the CPU idles around 45 degrees but with it just sitting on top with a good 10mm of clearance it's hovering between 52 and 55 degrees. That will increase when I lower the whole thing down so it means I have no option but to grab an unused GPU fan from somewhere and hack it in there to keep things cool. I imagine the temps will rise a bit if the CPU/GPU starts working hard (what the thermal tolerance of a lithium ion battery anyway...must look that up)
Yes I could have just left it all in the case the Air came in but there's no fun in that now is there? As for why one would want a big arse battery inside a keyboard...why not?...I wouldn't have to if Apple had a CMOS battery on the motherboard but they don't do that anymore. Plus the motherboard is designed to expect a battery and it works a whole lot better if there is one in there.
On the other hand, how many keyboard computers have a built in 6hr UPS huh?
Here's the battery sitting under the keyboard (trackpad removed for illustration).
You can see the location of the power LED here too. The IR port is just to the left of that.
Anyway, the battery should fit with a little modification. I'll have to cut a rebate in the back and there's a couple of tabs on the right hand side that feel like they have nothing in them so they can be chopped off as well (I think...don't want to be cutting into lithium with a dremel). I'll also have to extend the power cables as they won't reach the way they are (it's not plugged in in the pic above).
The main issue will be temperature.
Without the battery in there the CPU idles around 45 degrees but with it just sitting on top with a good 10mm of clearance it's hovering between 52 and 55 degrees. That will increase when I lower the whole thing down so it means I have no option but to grab an unused GPU fan from somewhere and hack it in there to keep things cool. I imagine the temps will rise a bit if the CPU/GPU starts working hard (what the thermal tolerance of a lithium ion battery anyway...must look that up)
Yes I could have just left it all in the case the Air came in but there's no fun in that now is there? As for why one would want a big arse battery inside a keyboard...why not?...I wouldn't have to if Apple had a CMOS battery on the motherboard but they don't do that anymore. Plus the motherboard is designed to expect a battery and it works a whole lot better if there is one in there.
On the other hand, how many keyboard computers have a built in 6hr UPS huh?
An added bonus
This didn't dawn on me before because I'm right handed...but my son is a leftie so might appreciate the advantage of having non-hard wired keyboard and trackpad.
Right handed
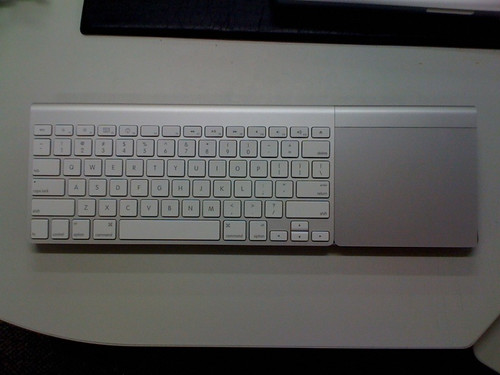
Left Handed
Ahh...anyway, off to lower the shocks and put on some 20" spinners. I'm not too concerned if I screw up the base at this stage as the internals aren't going to be that neat anyway. I've drawn up a basic plan and if worse comes to worse I'll get a local shop to cut some sheet metal and bend it all to shape (basic wedge box profile but the advantage will be I can get all the ports cut at the same time...and neatly :)
Right handed
Left Handed
Ahh...anyway, off to lower the shocks and put on some 20" spinners. I'm not too concerned if I screw up the base at this stage as the internals aren't going to be that neat anyway. I've drawn up a basic plan and if worse comes to worse I'll get a local shop to cut some sheet metal and bend it all to shape (basic wedge box profile but the advantage will be I can get all the ports cut at the same time...and neatly :)
Good Morning Reddit
Went to bed and woke up with 75k hits...70k of which are from reddit :)
The main criticism I got from there was why I hacked off a perfectly good keyboard and trackpad. Well, I didn't initially....but both keyboard and trackpad were heavily used (the button on the trackpad was half jammed) and so I decided 'what the heck' and decided to do what I did. It's not useable as a laptop anyway so why not.
:)
Monday, August 16, 2010
Update
------
Update: I've had several questions/comments about the fact that it's full of duct tape. I'll just say that at the moment it's still very much a work in progress and the tape works well for holding things in place and is also non-conductive.....plus it also holds the universe together so whatever can do that can't be half bad now can it ;). The motherboard is held in place by screws but that's about it.
Things still left to do:
1) cut a hole in the back for the power switch
2) re-route the bluetooth antenna.
3) lower everything by about 5mm (it's a nice height but can be lower still)
4) route an extension cable for sound
5) re-attach the USB port side
6) secure the trackpad and keyboard in place.
7) general tidy up and neaten things off.
I'd like to be able to keep the keyboard and trackpad separable. Once the fun of this little project is over I'd like to have them usable on my iMac (although I prefer the wired keyboard with the numpad)...after all, it's no longer a laptop. It's a desktop and an underpowered one at that (although according to geekbench it will give a dual G5 powermac a run for its money...for whatever that's worth). I doubt it will be used much beyond internet/email....maybe as an AppleTV replacement or something but that's about it I'd think.
Oh...and as to why I chose to pull it apart instead of getting it repaired, potentially for free, by Apple? Simply because it was written off so would have been junked anyway and hacking it is more fun then sending it away. I wasn't confident Apple would repair it for free anyway (under the "dodgy macbook air hinge" excuse)...although technically all the pieces 'could' be put back together if I could remember where all the screws go. If Apple want to replace a bucket of parts for free I'm happy to sent it to them :)
Interference
Hitting upon a small snag whereby the bluetooth antenna is too close to the antenna for the trackpad (Hello Apple...wired trackpad please )
Anyway, I have a fair few options for relocation. I'll test running it up along the back of the case and see what happens. Wifi appears to be fine as is the keyboard...but then the keyboard antenna appears to be in the rear of the unit whereas the trackpad antenna is in the base....all I have to go on there is the iFixit teardown and the reception issues I've been having so take that information with a grain of salt.
All experimentation and all fun and that's what it's all about now isn't it :)
I'm also getting some clip brackets made up so the keyboard/trackpad snap into place and are easily removed for battery replacement. (again apple...wired track pad please...then I can permanently fix the thing in pace).
Other than that, everything is working nicely. Will post a boot up video.
Sunday, August 15, 2010
Coming together
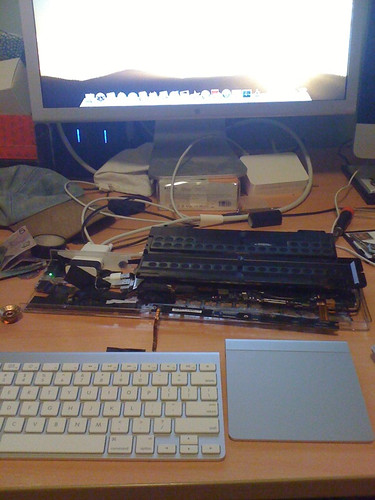
Behold!
That there is a working Mac with 1.6Ghz Core 2 Duo, 2GB RAM and 80GB hard drive.
Not 'quite' there yet with the case. I have to add some small mounting points for the keyboard and trackpad to rest on and attach the left hand side of the case where the USB ports are. However everything is in its place, the motherboard is bolted down so it can't move about and everything else is held in place in the most hack friendly method ever....black duct tape.
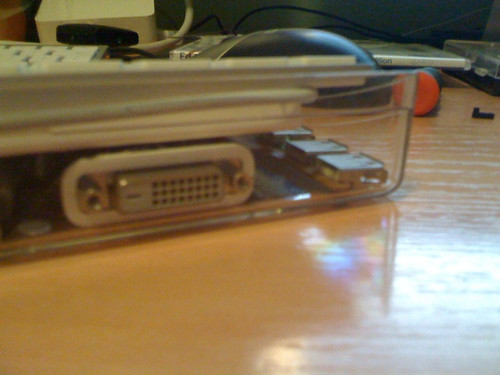
The DVI port on the back. You can still see the masking tape I used...that will come off eventually
The magsafe adapter...again with the masking tape. I'll have to cut a rebate as the case is still a little too deep but it works.
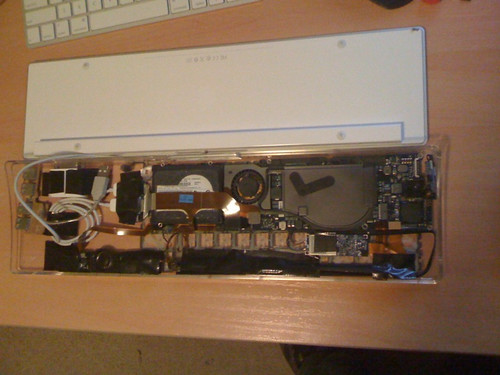
The internals....all covered in tape :)
When I'm feeling up to it I may use some other method but this keep all the wires and whatnot in place inside a case that was not designed for it.
The side USB ports. There will be a cover on here eventually with space for the USB ports to stick out.
And one last view from the front
Now it's basically down to the finishing touches and she'll be all done :)
Saturday, August 14, 2010
more cutting and masking
So here's a couple of pics of the holes I've cut out.
This one is for the magsafe adapter. you can kinda see how rough it is at the moment but this will be sanded down then beveled with the dremel .
Here you can see the hole I've cut for the DVI and also the whole side of the case has been removed. Into that I'll cut individual holes for the USB ports then re-attach it to the side. I've cut it as close to the edge as I can so hopefully the seam will be concealed somewhat.
Once they are on I'll bolt everything in and spark it up and see how it all looks :)
Oh, one last thing. The reason why this is coming in dribs and drabs is that I literally have maybe 30 minutes a day to play with it. The rest of the time I'm either at work, looking after kids or like later today, on a photo shoot. If not for that I'd say you could knock up something like this in a single day (not including glue drying time).
Friday, August 13, 2010
Cutting things up
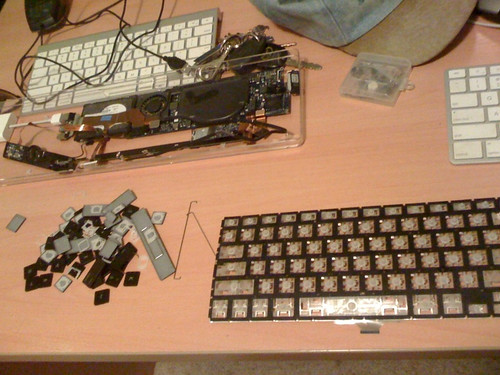
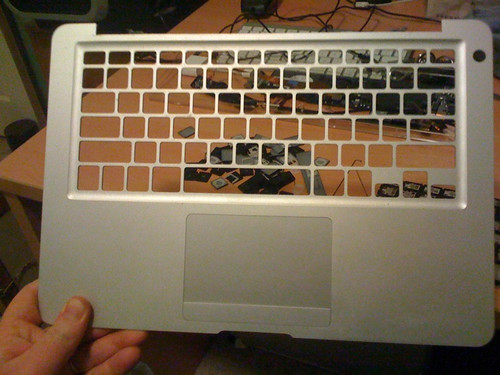
So I started to chop up the old keyboard case.
Did I mention this is the first time I've used a dremel?
Hmm...anyway, the cutting disk cuts through polycarbonate like butter...which means I need to have a steady hand. Especially so since I have a couple of large cuts to do.
Turns out the bluetooth keyboard with the magic trackpad isn't quite as long as the keyboard with numbed that the photos I've taken so far show. I've decided that since I'm cutting out half of one side for the USB ports I may as well chop off the whole side, make a faceplate of the off cut and replace.
Already done the holes for the dvi, MagSafe and motherboard mounts. For the two long cuts I need to make I'm going to have to build a rig to keep the dermal steady.
Thursday, August 12, 2010
So why a MacBook Air anyway?
So yeah...why a MacBook Air? Why not a MacBook or something with more expandability options?
As a component they are more expensive to get at but more importantly it's about space. The nice thing about the macbook Air's motherboard is how narrow it is. The other MacBooks have small motherboards too but they spread out at the connector end. This still makes them narrow enough to fit under a standard keyboard but that loses favour as it means you can't get the keyboard (a desktop keyboard that is) low enough to be ergonomically comfortable. It can be done of course but then you have to expand out the back and you end up looking like an Amiga or something (hmmm...thoughts enter my mind of using an A600 case.....)
Laptop keyboards manage to do it of course but then laptops have a nice wrist rest area to rest your palms on so height becomes less of an issue. Plus laptop keyboards are hell skinny. The Air's keyboard, even with with light sensor keys and all that, is still skinnier than the standard slim Apple keyboard and for a desktop keyboard the Apple offering is positively anorexic. Anyone that remembers using the old laptops where the keyboard was at the front (and the laptop was 3-4cm thick) will remember what an ergonomic nightmare it was trying to type on the damn thing. I remember one manufacturer got around this by making the keyboard detachable until Apple figured out if you shove the keyboard to the rear of the top case you gain space to rest your hands.the rest is history.
But I digress.
A motherboard about half the width of a standard keyboard is nice... just like the motherboard of the Air. Sure a few extra expansion ports or a CD drive would be nice...but then it wouldn't be as cool as having an entire computer tucked under a standard keyboard profile :)
Wednesday, August 11, 2010
Where's the modders?
Was going to link to a few other mac mod sites while I sit here waiting for my trackpad to arrive (any day now please)
Anyway, one would think that a google search for "mac mods" would yield some current results but unless my google fu is of kilter the results aren't all that amazing TBH.
Here's one on 10 amazing Mac mods...from 2006
This one is a bit more recent at 2008
The site macmod.com appears to be dead (google cache is from Feb 2010)
A blog that hasn't seen an update since September 2009 (but was nominated for a bloggers choice award apparently...0 votes though)
Oh god, my eyes (am I right?..no posts since 2008 yet it's in the top 10 hits in a google search?)
All seems fairly bleak :(
Oh well...I'l keep plodding along on my little project and see what comes of it.
Monday, August 9, 2010
Bluetooth it is
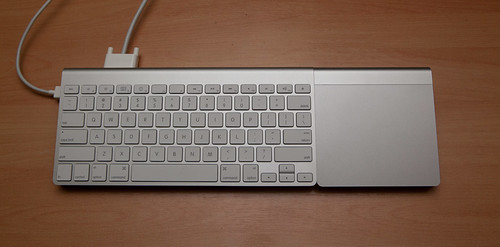
While the photos I've posted currently show the keyboard as being a slimline with number pad, I think I'm going to have to bite the bullet and buy a magic trackpad from the online store (bugger the Canberra stores and their lack of trackpads). It's going to make things easier from the perspective of running the external USB ports and also means that the keyboard and trackpad can be re-used elsewhere if needed (i.e. they won't be irreversibly attached to the unit. It also makes the layout a lot neater as the bluetooth keyboard is a bit over a cm deeper than the wired model which means there will be no gaps along the top.
In the next day or two I'll be making the cuts for the power, DVI and USB ports and if I have a wide enough drill bit, mounting the power button. It's taken a bit of tinkering to get to this point but I feel that the patience will have been worth it if it all comes right. Would hate to make a wrong cut somewhere if only because I have only one of the old perspex keyboards to play around with.
______
In addition I've done a couple of things to the blog to hopefully make the financial burden a bit easier. There's a couple of google ads around the place and there's also a paypal donate button over there on the right. Not that I'm asking you to click either of them but just in case you were wondering why they were there. Hopefully if enough people come here and take a look, and perhaps become inspired to do their own hacking, then this little project can partly pay for itself.
The point being...this isn't a site for me to beg for money...just so you know :)
Q&A
Could you hotwire the Magic Trackpad into the Air's power lines? Somehow... :} |
The trackpad (and the keyboard) survive quite nicely off the 3V it gets from 2 AA batteries. Since I'm not running a screen the 45W power supply could easily power both in addition to powering the system. I'd just need to bleed off some from the power rails and convert the 14.5v at the magsafe to 3v for the trackpad/keyboard.
The most annoying issue at the moment is that since Apple started using non user replaceable batteries their laptop motherboards no longer have PRAM backup batteries....since theoretically there is always the system battery connected. It's only annoying in that when you boot up for the first time the system clock resets itself. If you're networked it quickly syncs with the Apple time servers though so it's no deal breaker (unless you're Steve Jobs perhaps). As long as the power is connected to the magsafe the PRAM stays.
Almost there
(originally posted on MacTalk 9th August 2010)
Here's some images of the almost final product.
The rear DVI port. Will also extend the audio port but I need to go to Jaycar or somewhere and buy a couple of parts.
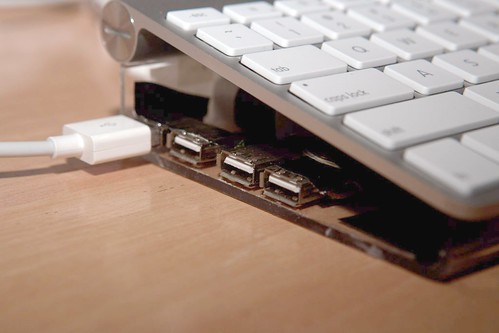
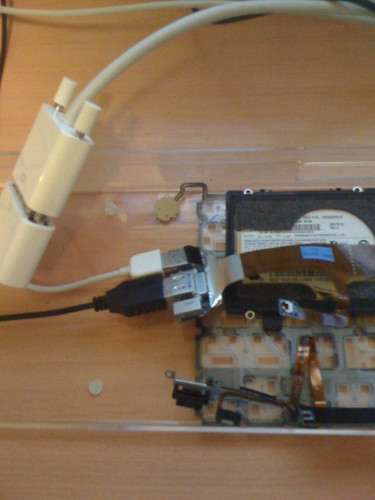
The four USB ports on the left hand side. I have to do some testing as this hub hangs off one of the keyboard USB ports which I recall is outside USB spec. If it operates normally (i.e. USB2 speed albeit unpowered) then I may leave it as is. If I plug the hub into the Air directly then I'll need to sacrifice one of the four ports and hotwire the keyboard to the hub. No big deal but it does mean cutting up a keyboard cord and I want to prevent as much of that as I can.

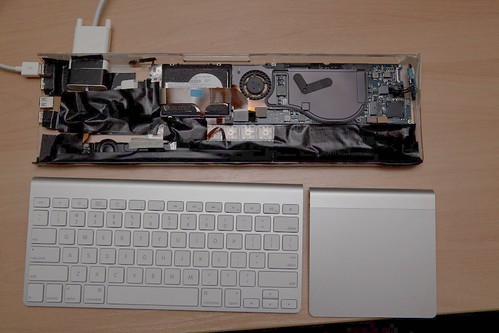
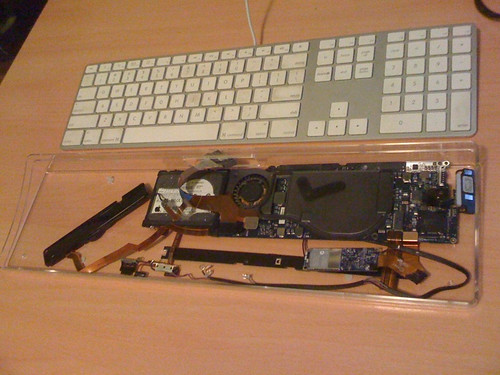
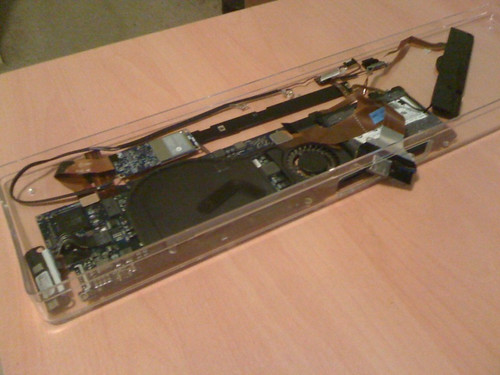
An internal view with all the components in their final resting place, ready for marking out locations for cutting and screwing. The speaker, antenna, IR and power LED run along the front. Mobo and hard drive at the back, bluetooth/wireless daughterboard in the middle. In the left portion you can see the keyboard cord coiled up, the naked $5 usb hub (not plugged in at that point) and DVI connector taped in place. The rear hole that I was going to use to locate the ports now serves as ventilation and I may still hack apart an old graphics card for its heatsink and fan and use this as exhaust.
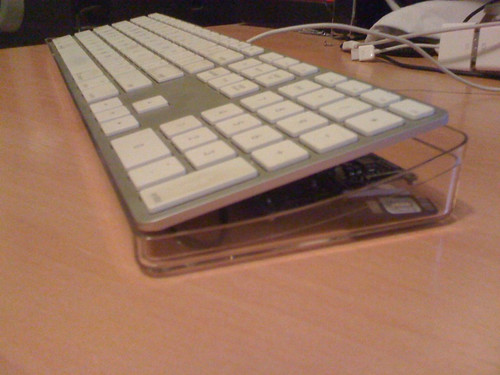
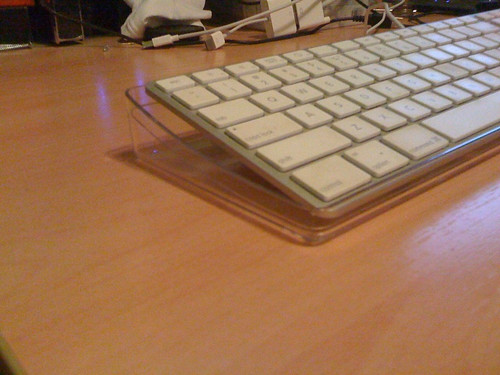
Everything in place. If I had all the port holes cut already this would be a working system (It currently works but with no holes there's no way to plug anything in)
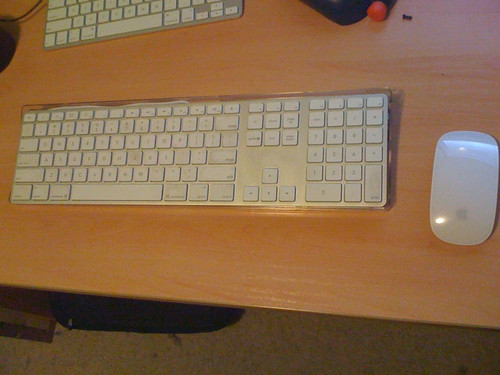
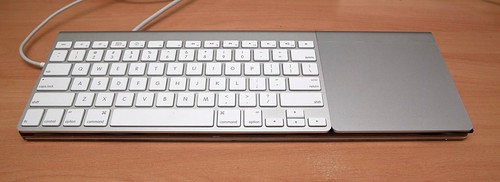
I am hoping to make this an all-in-one unit with a slim keyboard and magic trackpad on the right hand side. For that I need either a wired keyboard sans numberpad or a bluetooth keyboard and bluetooth magic pad. Would be really nice if Apple made the magic pad in a wired model (bonus if they made it do it snapped on to the side of the wired keyboard via one of the side USB ports).
Anyway, I can't buy the trackpad because no-one in Canberra has one. Testing the profile with my bluetooth keyboard shows that I would have to cut into the rear to allow for the battery compartment but it would make it all nice and neat. So for the meantime I'm using a spare wired keyboard (hence my reluctance to cut the cord) and an old dell mouse.
Here's some images of the almost final product.
The rear DVI port. Will also extend the audio port but I need to go to Jaycar or somewhere and buy a couple of parts.
The four USB ports on the left hand side. I have to do some testing as this hub hangs off one of the keyboard USB ports which I recall is outside USB spec. If it operates normally (i.e. USB2 speed albeit unpowered) then I may leave it as is. If I plug the hub into the Air directly then I'll need to sacrifice one of the four ports and hotwire the keyboard to the hub. No big deal but it does mean cutting up a keyboard cord and I want to prevent as much of that as I can.
An internal view with all the components in their final resting place, ready for marking out locations for cutting and screwing. The speaker, antenna, IR and power LED run along the front. Mobo and hard drive at the back, bluetooth/wireless daughterboard in the middle. In the left portion you can see the keyboard cord coiled up, the naked $5 usb hub (not plugged in at that point) and DVI connector taped in place. The rear hole that I was going to use to locate the ports now serves as ventilation and I may still hack apart an old graphics card for its heatsink and fan and use this as exhaust.
Everything in place. If I had all the port holes cut already this would be a working system (It currently works but with no holes there's no way to plug anything in)
I am hoping to make this an all-in-one unit with a slim keyboard and magic trackpad on the right hand side. For that I need either a wired keyboard sans numberpad or a bluetooth keyboard and bluetooth magic pad. Would be really nice if Apple made the magic pad in a wired model (bonus if they made it do it snapped on to the side of the wired keyboard via one of the side USB ports).
Anyway, I can't buy the trackpad because no-one in Canberra has one. Testing the profile with my bluetooth keyboard shows that I would have to cut into the rear to allow for the battery compartment but it would make it all nice and neat. So for the meantime I'm using a spare wired keyboard (hence my reluctance to cut the cord) and an old dell mouse.
Sunday, August 8, 2010
Built for Modding
(originally posted on MacTalk 8th August 2010)
I reckon Apple built the Air for modding
Bonus - The motherboard has built in standoffs that are just high enough (about 2mm) to allow clearance. All I need do is drill some teeny holes in the case and I can use the same screws that held it in the Air chassis to keep it in place in its new home.
Also I purchased a cheap arse USB hub from the reject shop for $5. This will let me plug in the keyboard but also allow easily accessible USB ports. Also this will permanently become a DVI output system. The micro DVI to DVI adapter will be permanently mounted inside the case with a hole cut to allow access. This has the added bonus that it acts as a riser for the keyboard which will be at the perfect height. All I need is a riser for the other side so the keyboard doesn't flip.
Everything is now in the case and temporarily taped into place ready for marking and eventual cutting with the dremel. Magsafe on the right hand side, power switch at the rear, DVI out left rear and USB ports along the left side.
Photos shortly.
Saturday, August 7, 2010
Slowly getting things together
(originally posted on MacTalk 7th August 2010)
Some more pics but not a lot of progress made on the actual case mod. Just slowly getting things together and working out what I need and what I can leave out.
A couple of things I discovered:
1) The LED keyboard backlight system is really elegant. The whole system takes up maybe 0.5mm thickness and illuminates the whole keyboard evenly with 5 LED's
2) The Air's laptop keyboard was not designed to be removed easily. The trackpad, not at all (it's spot welded in). If either of those components fault the whole top half of the laptop is replaced.
Some more pics:
Pulling the membrane out of the keyboard. I need this to have an operative power button.
Empty top half. Unibody construction before Apple even made it a marketing term.
The reason I needed the whole keyboard membrane...one lonely power button. Will be easy to integrate this into the rear of the case.
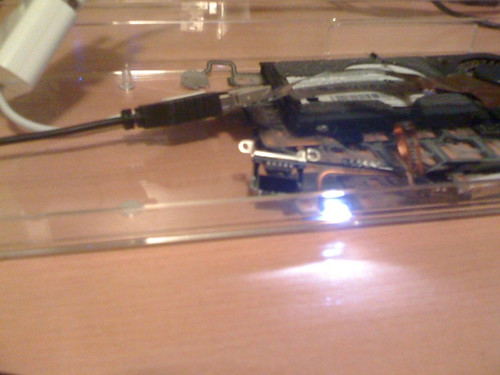
Main screen turn on - The system up and running. The speaker isn't connected though so no noises (literally...if the fan wasn't visible you wouldn't be able to tell this was even running). Power button works as expected.

The power LED...damn bright.
Some more pics but not a lot of progress made on the actual case mod. Just slowly getting things together and working out what I need and what I can leave out.
A couple of things I discovered:
1) The LED keyboard backlight system is really elegant. The whole system takes up maybe 0.5mm thickness and illuminates the whole keyboard evenly with 5 LED's
2) The Air's laptop keyboard was not designed to be removed easily. The trackpad, not at all (it's spot welded in). If either of those components fault the whole top half of the laptop is replaced.
Some more pics:
Pulling the membrane out of the keyboard. I need this to have an operative power button.
Empty top half. Unibody construction before Apple even made it a marketing term.
The reason I needed the whole keyboard membrane...one lonely power button. Will be easy to integrate this into the rear of the case.
Main screen turn on - The system up and running. The speaker isn't connected though so no noises (literally...if the fan wasn't visible you wouldn't be able to tell this was even running). Power button works as expected.
The power LED...damn bright.
Pulling it apart
(originally posted on MacTalk 7th August 2010)
heh...pulling it all apart was the easy bit....now I gotta make it all fit together :)
heh...pulling it all apart was the easy bit....now I gotta make it all fit together :)
Some pics to whet your appetite :)
(originally posted on MacTalk 7th August 2010)
The parts in a rough layout in the old white keyboard perspex. This is to get an idea of where things will be so I can mark them out and minimise folds in cables.
The long black thing at an angle is the speaker unit, magsafe to the right, wifi/bluetooth unit is the small blue and silver thing in the middle, IR and power LED slightly left of front centre, hard drive and mobo at the rear (where there is greater clearance) and the display/USB module is hanging out the back but plenty of slack on the data ribbon.
A look at the rear of the case where the old USB ports used to be. The Air's connectors for audio, display and USB will line up to this perfectly. Need to make a bracket though.
Clearance check to see what the space is like in there. Plenty of room on the left for an auxiliary outlet fan to dissipate heat.
Yes, under all this is a fully functioning Mac :)
Ignore the keyboard cable dangling out the back. In the finished product the keyboard will be connected to the motherboard internally and all you'll see at the back will be a display cable and maybe USB. Wifi and Bluetooth are fully functioning.
Friday, August 6, 2010
Mini update
(originally posted on MacTalk 6th August 2010)
Everything that can be pulled out of the case has been removed and the motherboard laid bare. One by one I added components to the mobo...the bare minimum required to get the system booting.
Hard Drive
USB/display output module
WiFi/Bluetooth module
Magsafe
booted up...all good except all of a sudden I have 'kernel_task' taking up 150% cpu and the thing is running slow as a dog.
A bit of research indicates this is a thermal issue but what was causing it? The CPU wasn't overheating yet OS X thought it was...the heatsink was in place and barely warm to the touch.
Looking back at the remaining unattached components I noticed a trace on the ribbon cable that leads to the IR sensor and power LED. The trace went all the way to the front of the chassis, connected to what looked like a small resistor then looped back to the motherboard.....whatever it was (thermostat perhaps), not having it connected was affecting the thermal logic because as soon as it was connected the CPU returned to idle.
I've also dismantled a white Apple keyboard and have an initial layout of components. So far things are looking pretty good in terms of space and where ports will be located. The only major sticking point at the moment is that the power button is part of the keyboard circuitry so unless I use the Air's keyboard I don't get a power switch.
Onward and upward
Thursday, August 5, 2010
ZIF PATA CF ETC
(originally posted on MacTalk 5th August 2010)
MBA rev A uses a 40pin ZIF ribbon PATA interface. I can find plenty of ZIF to SATA/PATA/CF adapters (to plug a 1.8" drive into a regular SATA caddy) and plenty of CF to ZIF adapters (so I 'could' use a CF card as a makeshift SSD) but so far no 2.5" PATA or SATA to ZIF....so thus far I'm unable to use a 2.5" or larger drive in my project without connecting it via USB which would just be pointless.
MBA rev A uses a 40pin ZIF ribbon PATA interface. I can find plenty of ZIF to SATA/PATA/CF adapters (to plug a 1.8" drive into a regular SATA caddy) and plenty of CF to ZIF adapters (so I 'could' use a CF card as a makeshift SSD) but so far no 2.5" PATA or SATA to ZIF....so thus far I'm unable to use a 2.5" or larger drive in my project without connecting it via USB which would just be pointless.
Need to go Shopping
(originally posted on MacTalk 5th August 2010)
Working on this I must say what a marvel of engineering the Air's motherboard is. It's only a few mm wider than an iPhone and about 60% longer. The two largest components on it are the heat sink and the fan. If you don't count the various connectors needed to hook together all the other parts (keyboard, hard drive, speakers etc) it's essentially a CPU, GPU and a couple of ram chips held together with the minimum of circuit board....and it would give a dual G4 powermac a run for its money (biggest drawback is the slow arse hard drive)
With the tech Apple has bought/developed since the Air's release I would not be surprised if we see the next Air essentially as a Mac on a chip.
back to hacking....hmm...need to go shopping first.
Making things fit
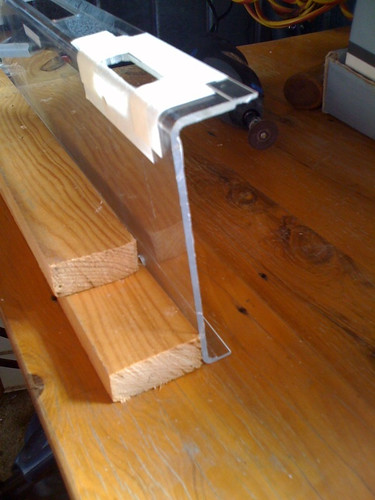
(originally posted on MacTalk 5th August 2010)
Things are coming together already. I won't be able to utilise the white keyboard as-is without some modifications as the space only exists in the back 2-3cm of the acrylic case...not wide enough to fit the Air's motherboard (which is about 6.5cm wide)
However we have ways of making things fit
Things are coming together already. I won't be able to utilise the white keyboard as-is without some modifications as the space only exists in the back 2-3cm of the acrylic case...not wide enough to fit the Air's motherboard (which is about 6.5cm wide)
However we have ways of making things fit
SCORE
(originally posted on MacTalk 5th August 2010)
***SCORE***
Managed to pick myself up a free MacBook Air
Here it is


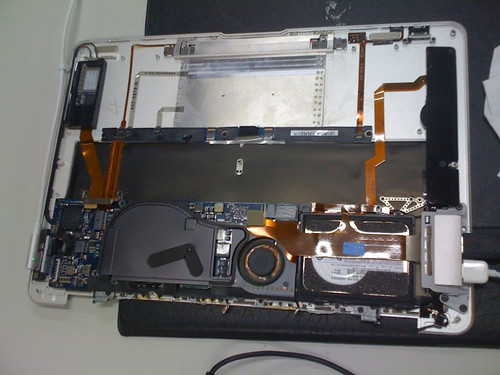
Awesome...although as you can see the condition leaves a lot to be desired. The screen would work perfectly if the data cable running to it wasn't severed.
The good news?...it still boots
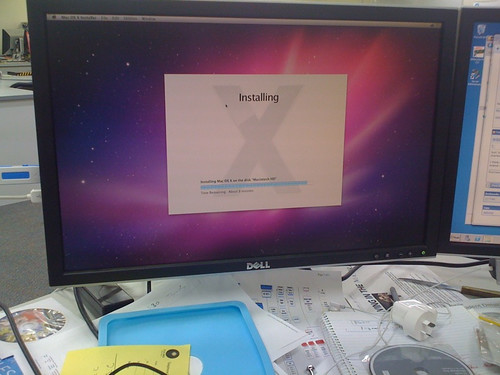
Here I am installing Snow Leopard to it (via handy USB key with SL image on it)

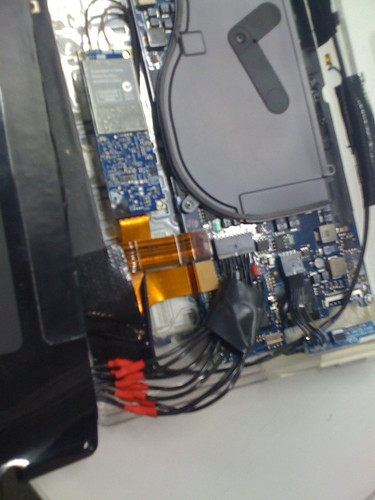
And a shot of the case with all the non-essentials removed.
Anyway...the plan
As you can imagine the unit is now fairly useless as a laptop. So, seeing as I didn't have to pay for this thing I'm going to convert it into a desktop computer...all I need is a case...
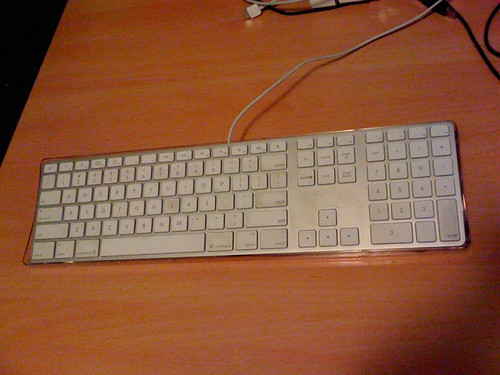
....hmmm...that white Apple keyboard seems to be pretty roomy inside...
stay tuned. :)
***SCORE***
Managed to pick myself up a free MacBook Air
Here it is
Awesome...although as you can see the condition leaves a lot to be desired. The screen would work perfectly if the data cable running to it wasn't severed.
The good news?...it still boots
Here I am installing Snow Leopard to it (via handy USB key with SL image on it)
And a shot of the case with all the non-essentials removed.
Anyway...the plan
As you can imagine the unit is now fairly useless as a laptop. So, seeing as I didn't have to pay for this thing I'm going to convert it into a desktop computer...all I need is a case...
....hmmm...that white Apple keyboard seems to be pretty roomy inside...
stay tuned. :)
Subscribe to:
Posts (Atom)